6.2 | Power BI Online platform - An overview
The Power BI Online Service is the cloud platform where we publish datasets and reports to be shared with colleagues in the organization. The platform is part of the Microsoft 365 (MS365) cloud and it can either be directly accessed via powerbi.com or via office.com (as an app).
Hosting and sharing datasets and reports is surely the main purpose of the platform. However, there are also other helpful features and tools like for example dataflows. In chapter VERWEIS, I gave an overview of the different components of the platform:
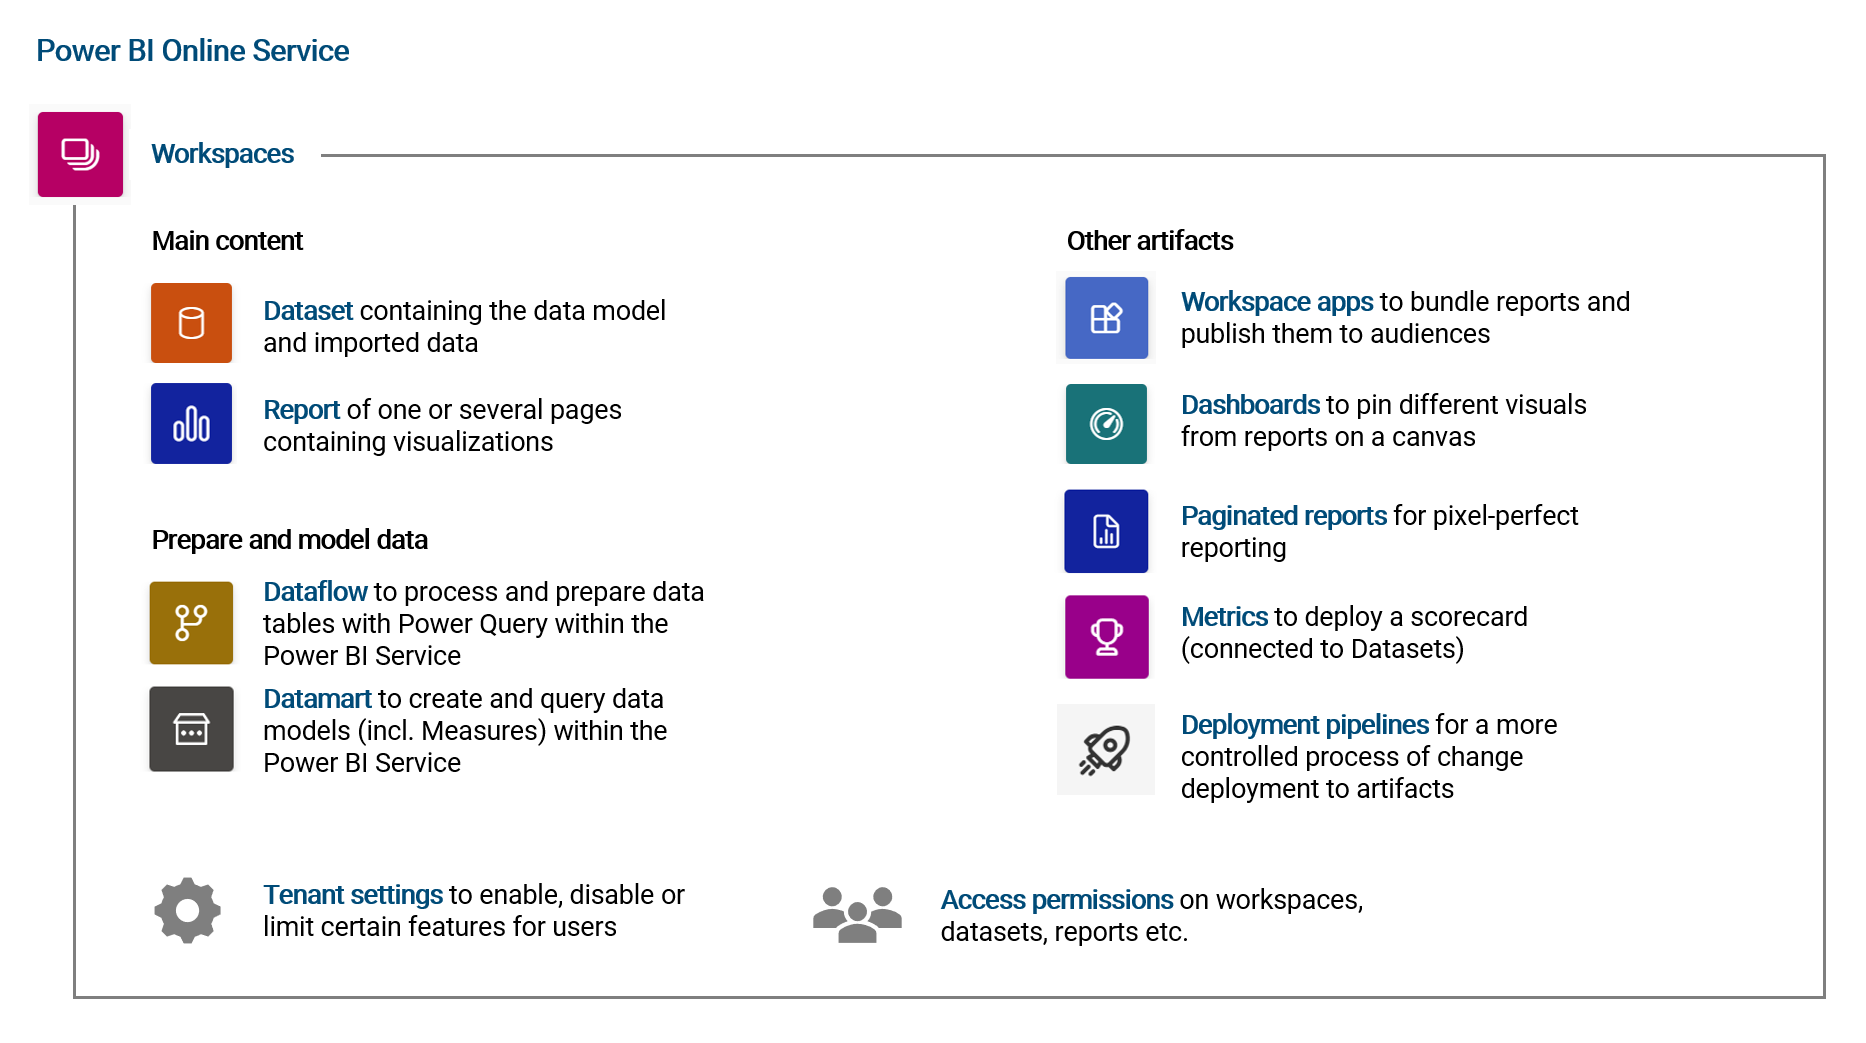
All content on the platform is organized in workspaces which act like folders that contains different files like datasets, reports, dataflows, datamarts etc. For each workspace, access permissions can be configured individually with different roles.
Publishing, sharing, consuming and editing content on the Power BI Online Service requires the user to have a Power BI Pro license. 1 In chapter VERWEIS, we will look at some of the features available as part of the Power BI Premium license.
Who has access to which content on the platform is controlled via different levels of access permissions on (1) tenant level, (2) workspace level and (3) individual content level (e.g. dataset or report).
6.2.1 | Publishing a dataset
In order to explore the platform better, let's publish our demo dataset to a workspace. Make sure you are logged with your MS365 credentials in Power BI Desktop, then click the button Publish under the Home ribbon.
In the appearing window, you are asked where you want to publish the dataset. If you do not have a workspace created yet, simply use the My Workspace option.
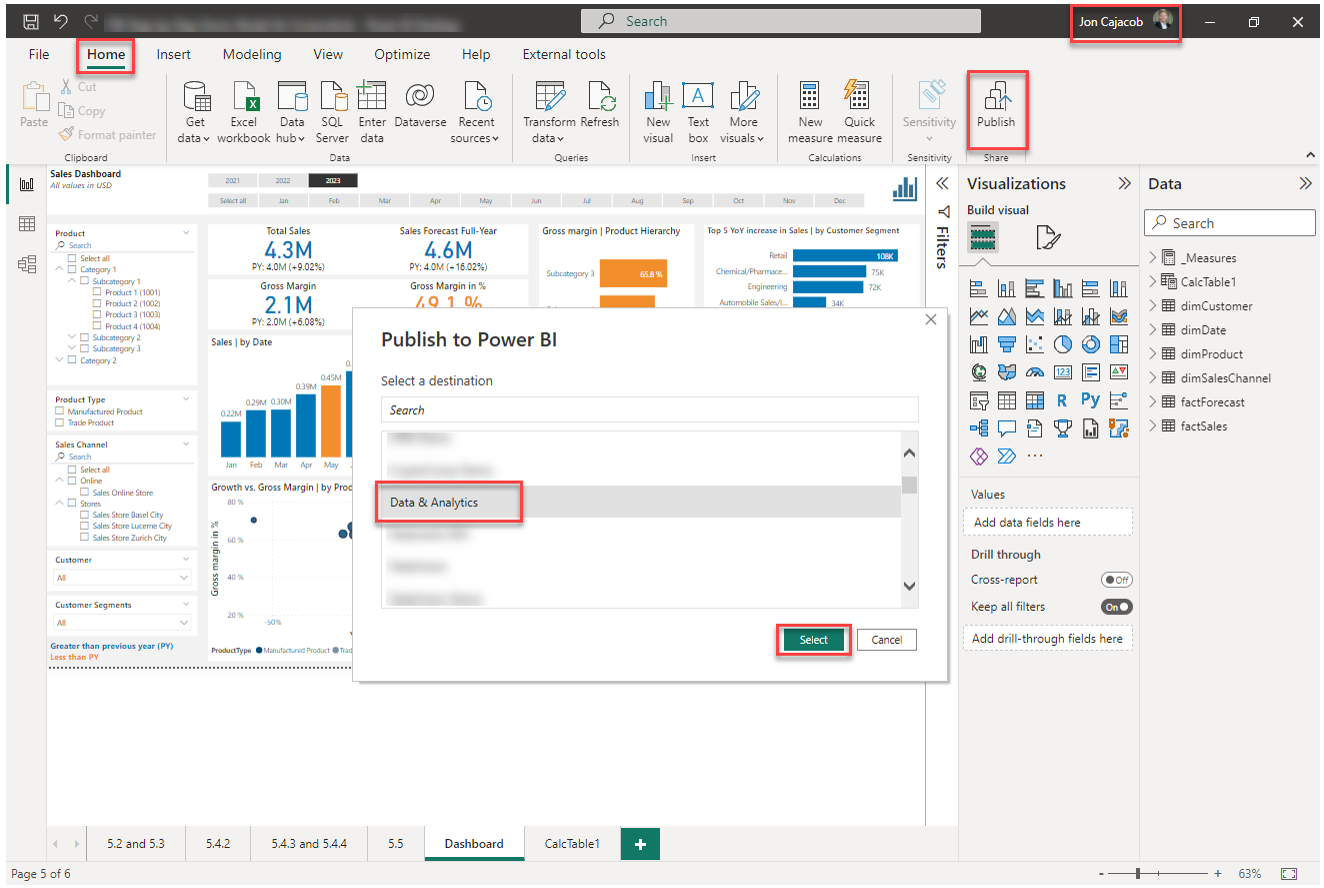
Please note the following:
- The name of the published dataset and report will be equal to the filename of the Power BI Desktop file (.pbix) as of the time of publishing
- If you are publishing a dataset to a workpsace where a dataset with the exact same name already exists, Power BI will ask you if you want to overwrite the existing dataset. This is the standard way of publishing a new version of a dataset and its reports
6.2.2 | Navigating the Power BI Online Service
The following screenshot highlights the most relevant navigational elements of the Power BI Service and in particular of a single workspace:
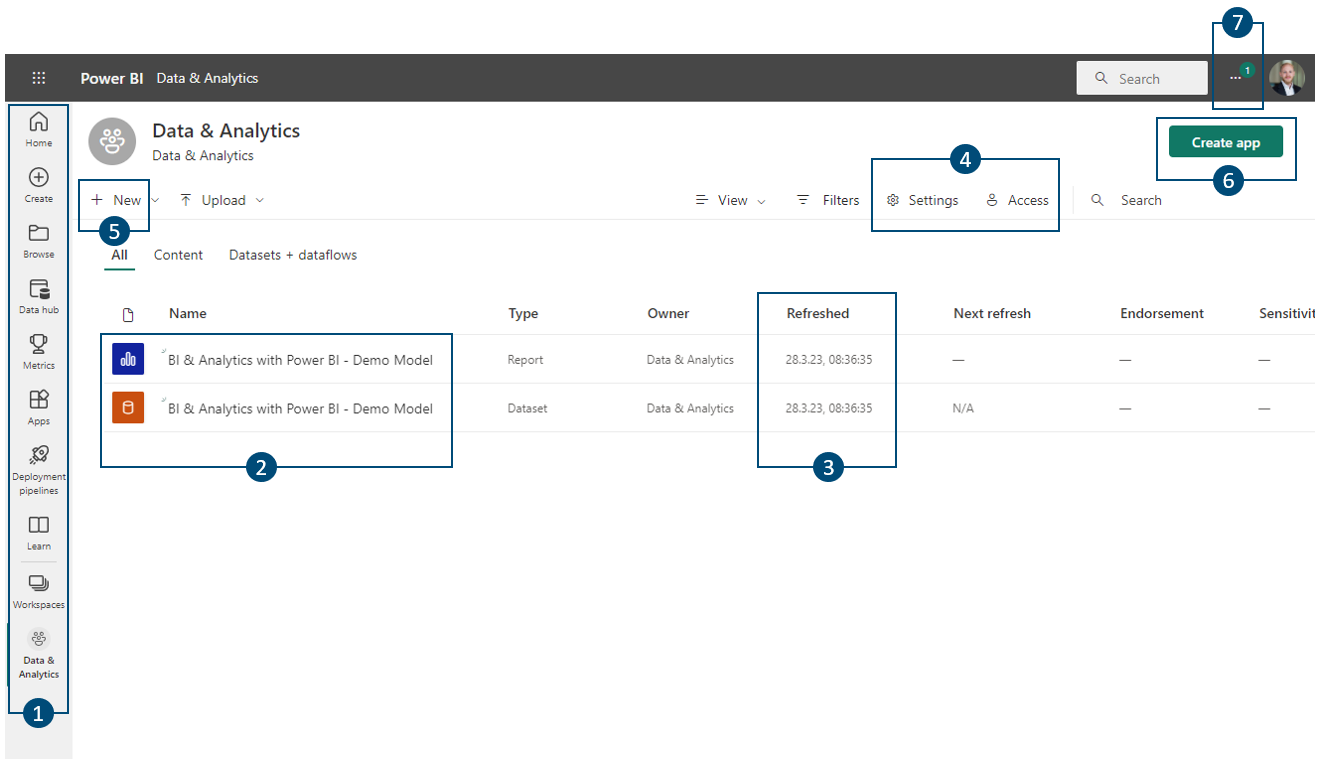
Legend
- Main navigation pane of the Power BI Service including navigating the workspaces
- Content inside the workspace; Here the just uploaded dataset and associated report
- Timestamp when the dataset has been refreshed the last time
- Workspace settings and access permissions
- Creating a new report, dataflow etc. inside the workspace
- Creating a new workspace app
- Accessing the Power BI Service settings and helpful links
6.2.3 | Creating and configuring workspaces
To create a new workspace, click on Workspaces in the main navigation pane and the use the button + New Workspace:
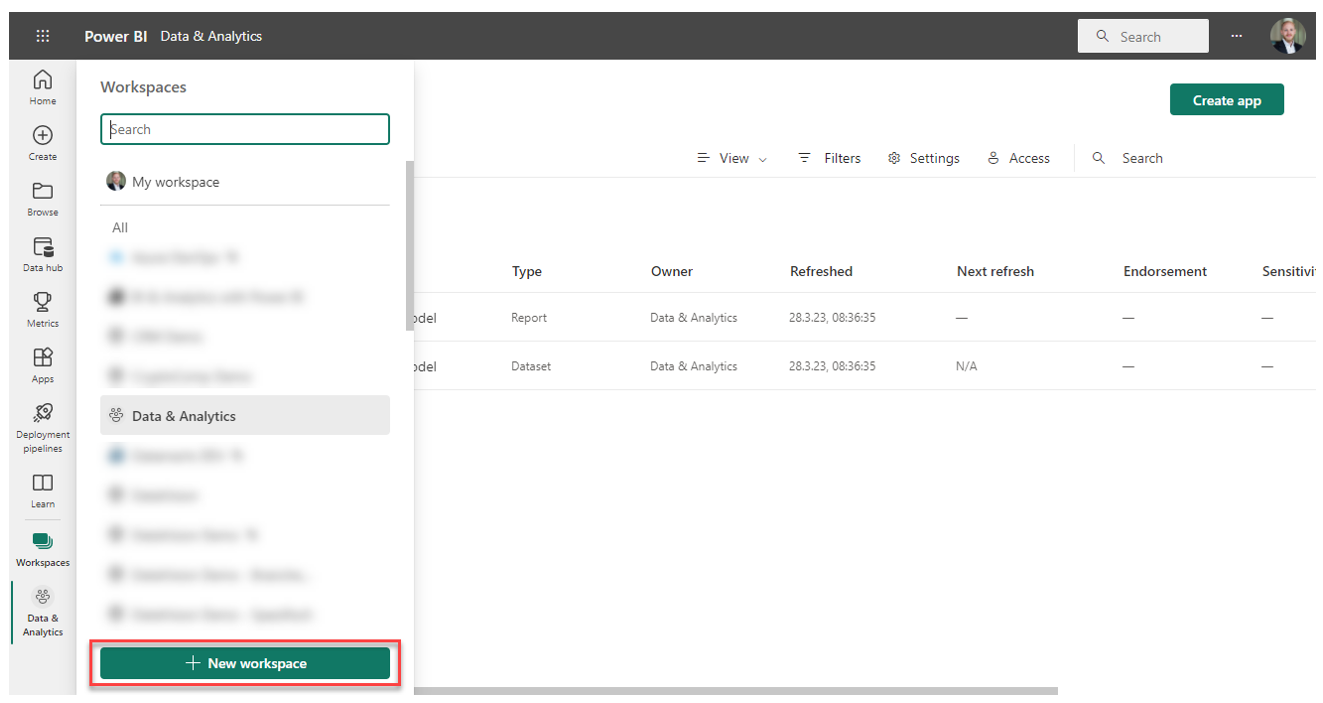
The most important settings for a workspace are the workspace name and the license mode which is either Pro or Premium (per user or capacity). All settings can be changed later.
Regarding the workspace naming I recommend to use descriptive names without abbreviations or code words as users might browse workspaces later and it is as such easier for them to identify content. The same goes for dataset and report namings.
6.2.4 | Dataset and report settings
Among the most important things we configure in the Power BI Service pertains the dataset (and report) settings. We can access them via the three dots when hovering over a dataset:
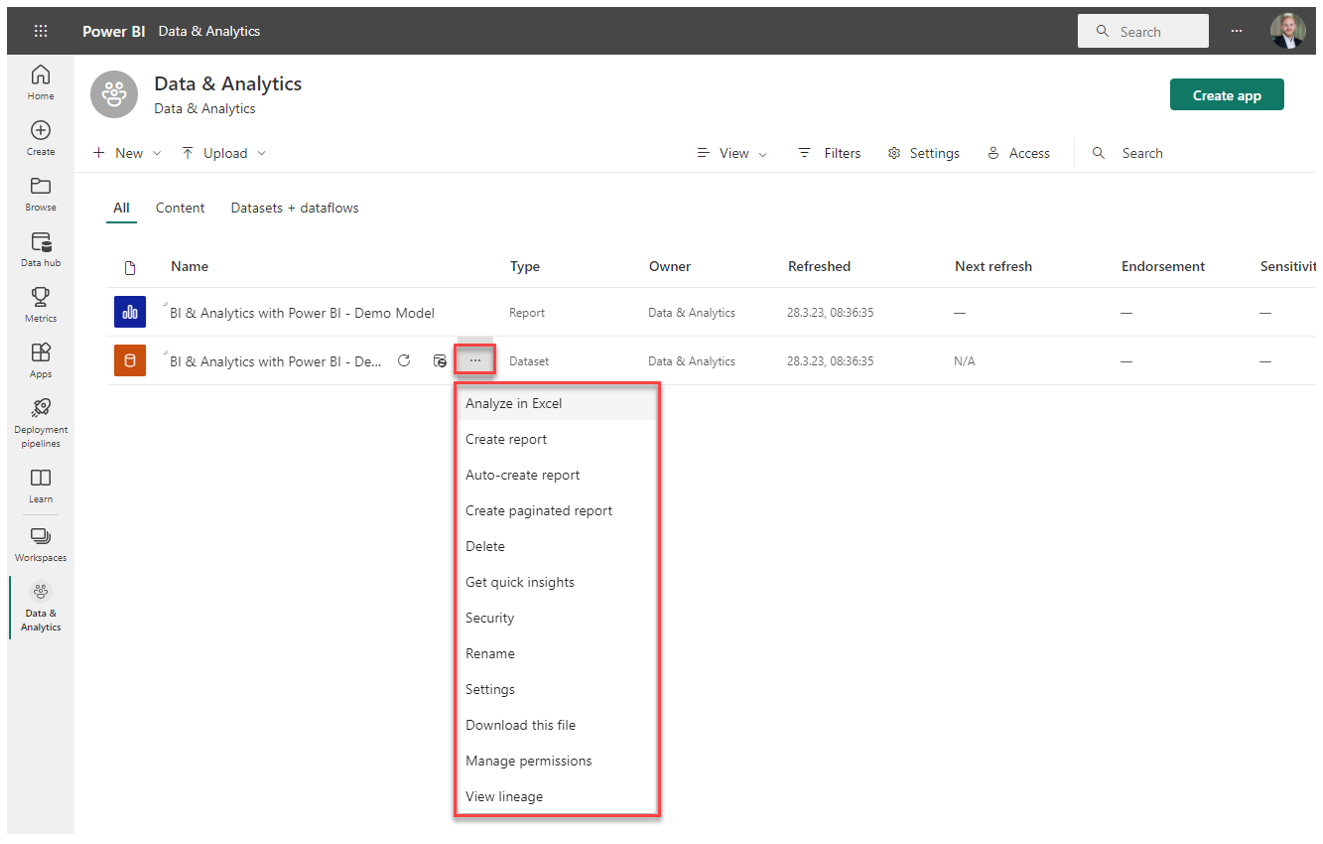
The most relevant settings are:
- Delete: Deleting the dataset and associated reports
- Security: Managing row level security groups (see chapter VERWEIS)
- Settings: In particular the automated data refresh settings (see below)
- Download this file: Downloading the pbix
- Manage permissions: Sharing the dataset with colleagues in the organization
- View lineage: See the data lineage and dependencies (i.e. what sources does the dataset use)
The most important settings for a dataset pertain the configuration of the automated (scheduled) data refresh and if applicable the parameter settings:
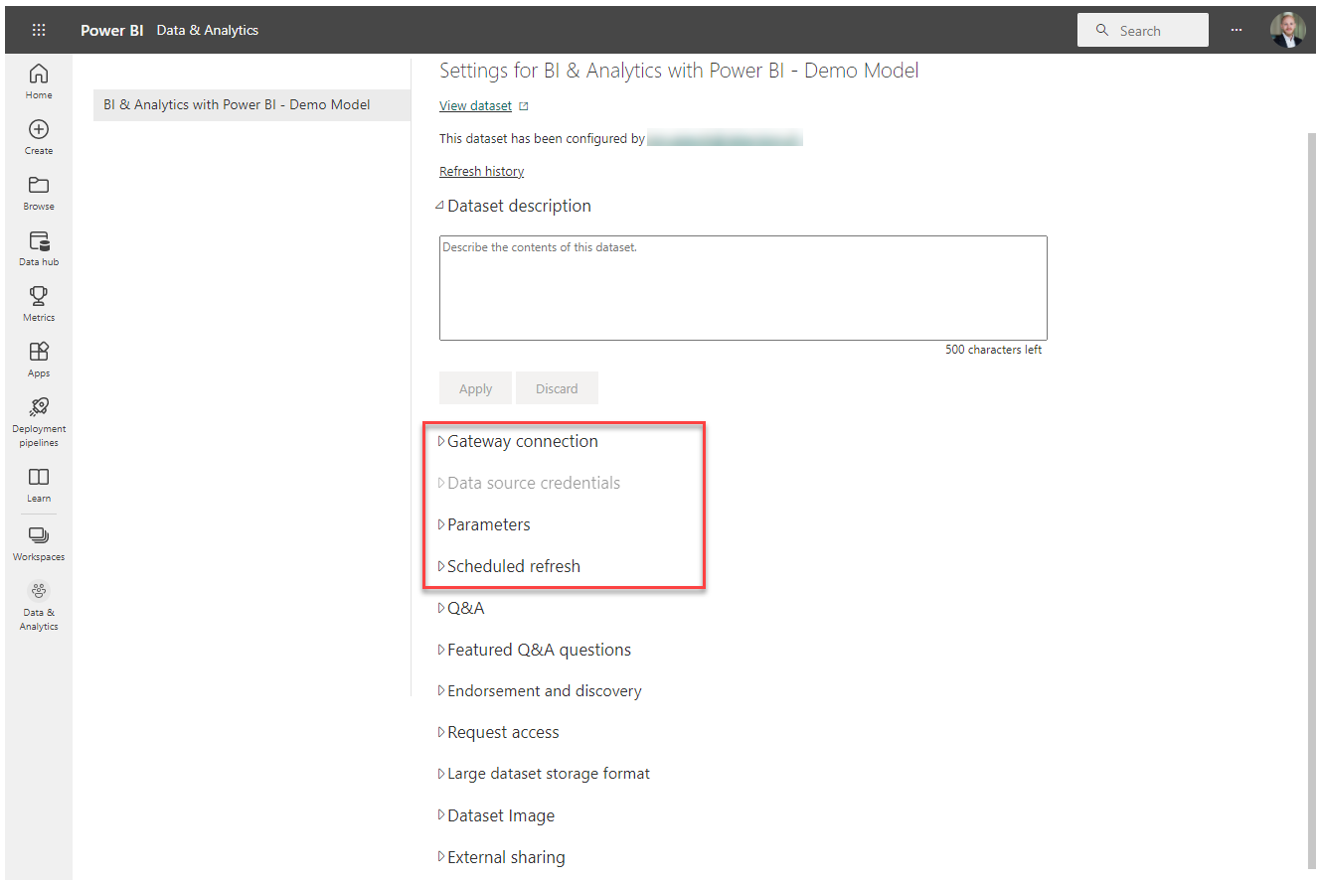
Note, in order for the automated data refresh to be available for a given dataset, the following requirements have to be met:
- If one or many data sources are hosted on an on-premise network, a Power BI Gateway has to be installed and kept running. The gateway acts as an agent that allows the data transfer between the on-premise network and the Microsoft 365 cloud platform (Azure)
- For data sources that are hosted on a public cloud network, the appropriate data source credentials have to be configured on the dataset. For example, an Excel spreadsheet that is saved on a Sharepoint part of the MS365 cloud
We will walk through the configuration of the automated data refresh in the next chapter (see VERWEIS).
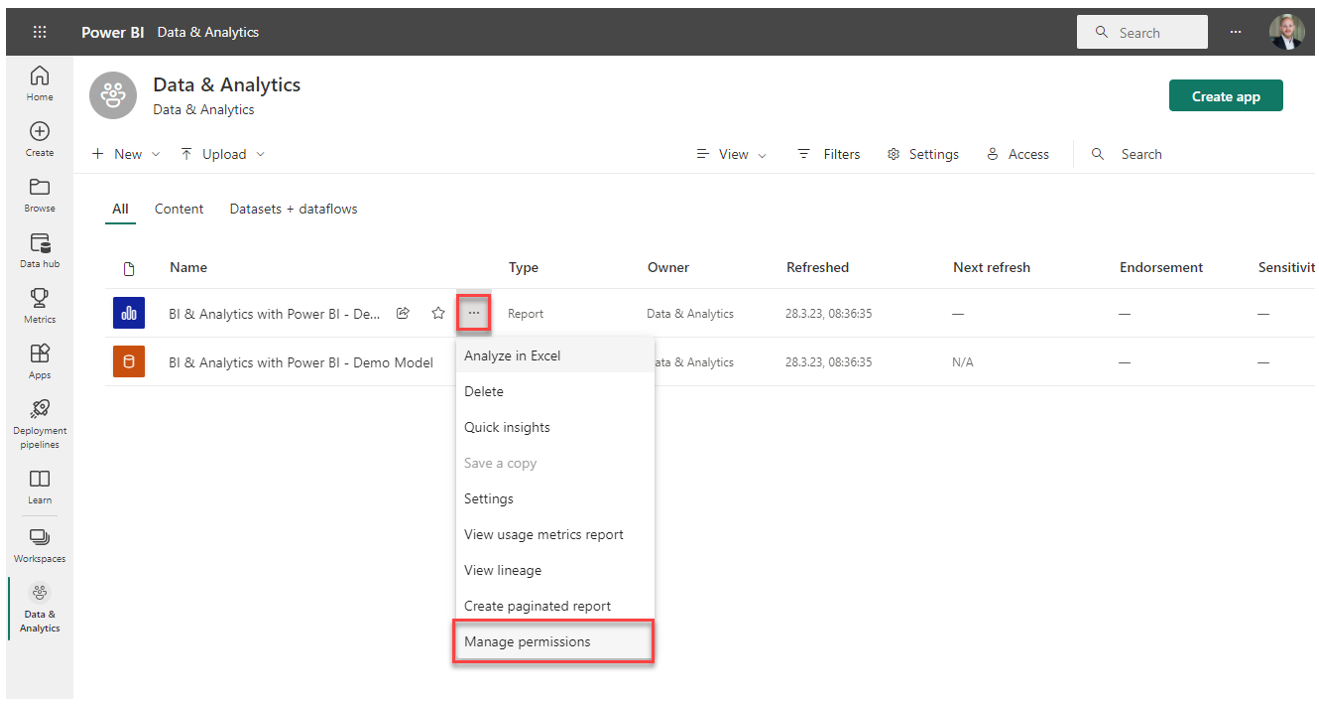
6.2.5 | Sharing a report with another colleague (manage permissions)
To share a published report with a colleague, navigate to the permission settings of the report via Manage permissions:
In the sharing settings, navigate to the ribbon Direct access and click on Add user. In the appearing window, add the e-mail address of the user you want to share the report with. You can also add multiple e-mail addresses.
If the user shall only view the report without editing or the permission to re-share, de-select the two first options and hit Grant access.
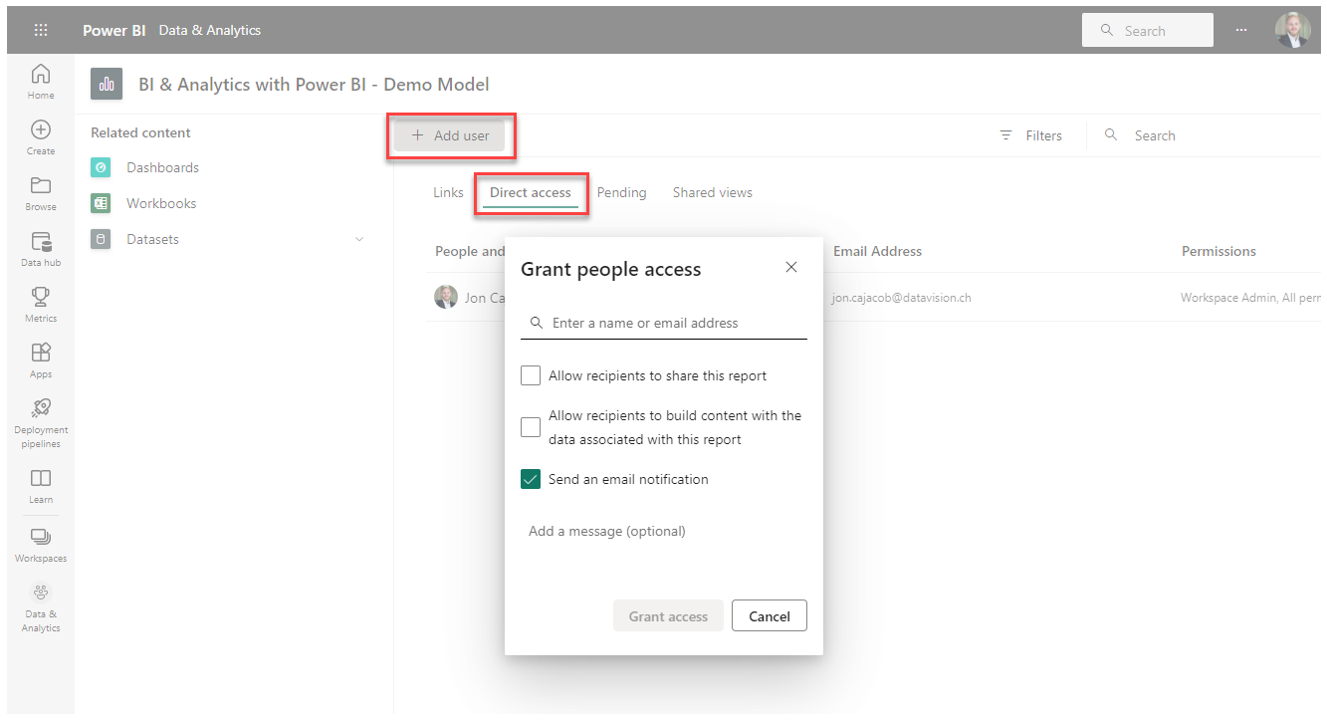
Note, with this way of sharing a report, the user will have to navigate to Shared with me via Browse in the main navigation to find the report. This is because we did not grant the user access to the workspace itself.
We will discuss access permissions in more detail in chapter VERWEIS.
6.2.6 | Editing or creating a new report directly in the Power BI Service
We can create or edit reports published to a workspace in the Power BI Service directly within the browser.
1. Editing an existing report
To edit an existing report, open it and then click on Edit in the report header:
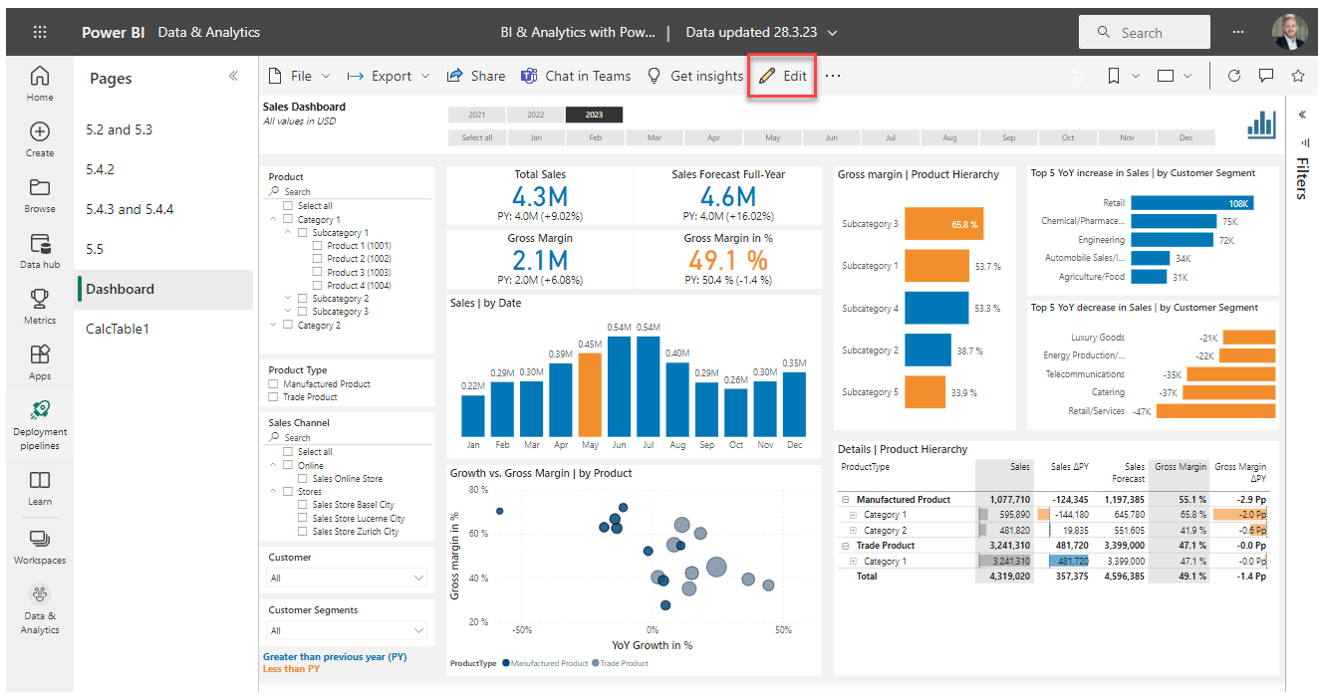
The user interface for placing and populating visuals on report pages is the same as in Power BI Desktop. When you are done with editing, save the existing report or create a new one with the Save as option. With the button Reading view you can exit the editor.
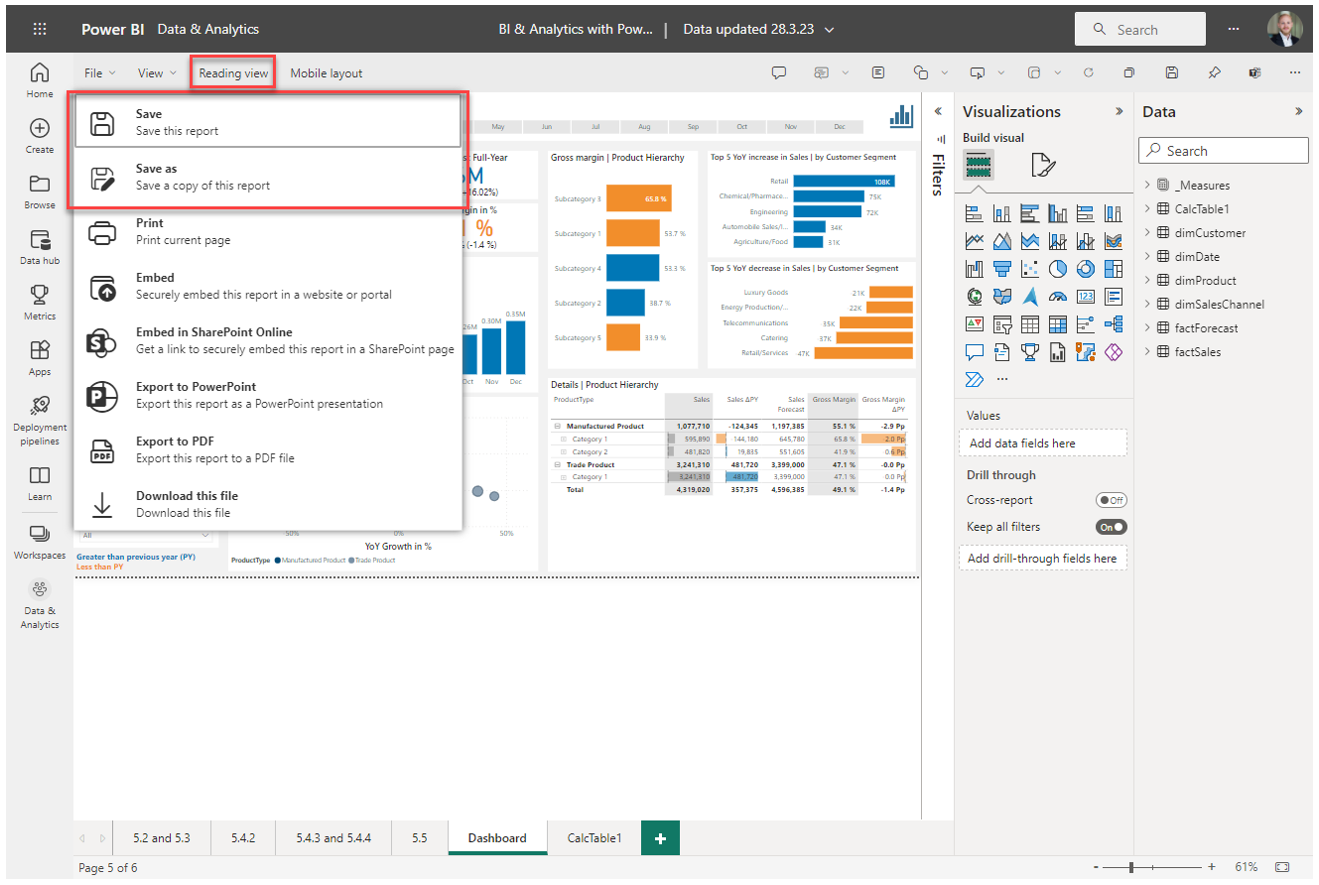
Please note, there are certain limitations of the online editor compared to Power BI Desktop. One important limitation as of the time of writing this is the inability to edit or create measures. Microsoft has this on the roadmap though.
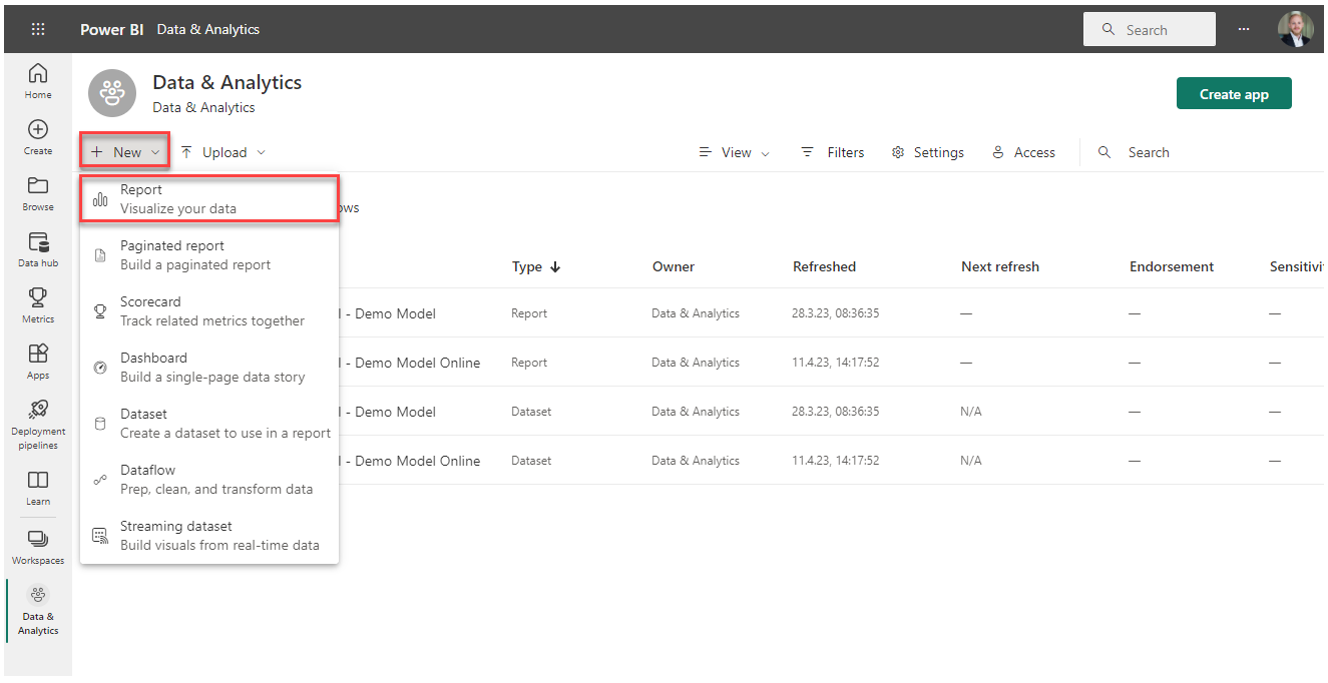
2. Creating a new report based on an existing dataset
In a given workspace we can create an entirely new report that is connected to an existing dataset. To do that, open the dropdown + New in a workspace and select Report. Then, select Pick a published dataset and select the dataset you want the new report to be based on. Create the report pages and save the report in the workspace.
6.2.7 | Power BI tenant settings
The Power BI tenant settings concern the general configurations of the Power BI Service. Note, in order to be able to access and edit the tenant settings, a user has to have the Power BI Administrator role given in the Microsoft 365 Admin Center.
The way most settings are configured is via enabling or disabling a setting for the entire organization or for specific groups of people via security groups.
One popular example of a tenant setting is the ability to export data from a dashboard to Excel:
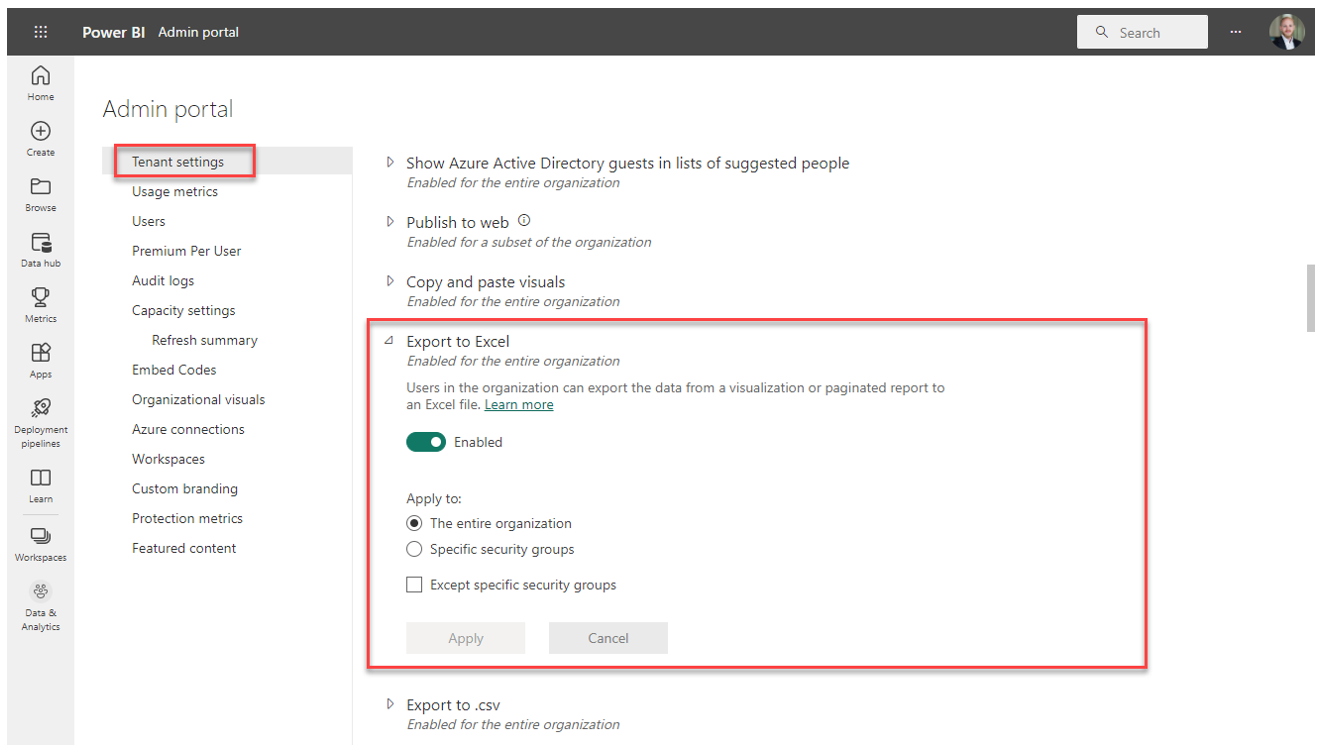
If you want to limit the circle of users who are allowed to export data, you need to create a security group in the Microsoft 365 Admin Center and then enable this setting only for this security group.
To go through the list of possible settings would certainly be over the top for this book. Further, given the monthly update of Power BI, this list changes often as new features are added or others are discontinued.
How the settings should be configured for your tenant very much depends on the overall BI & analytics governance you have in place in your organization. If for example data security is a high priority because maybe you are handling sensitive data, you would rather limit for example data export settings.
The official documentation of the tenant settings can be found here: https://learn.microsoft.com/en-us/power-bi/admin/service-admin-portal-about-tenant-settings
1 See here for a comparison of licenses: https://powerbi.microsoft.com/en-us/pricing/