3.4 | Preparing the product dimension (dimProduct)
In this chapter we continue with preparing the product dimension dimProduct. For this table, some transformation steps are the same as for dimCustomer (in general you will notice over time that there is a certain set of transformations that is relevant for almost all data tables). Some transformation steps are new and will broaden your understanding of Power Query.
1. Inspect the (raw) data table
As for dimCustomer, we first want to inspect the table to understand the transformations we need to apply. Here again, Power Query automatically applied some basic steps like promoting the headers and changing column data types.
Unlike in dimCustomer, column headers are correctly set from the start (because in the underlying excel the column headers are in the first row). Before setting the data type for each column, let's select only the columns which we actually need for the analysis.
2. Select the columns needed
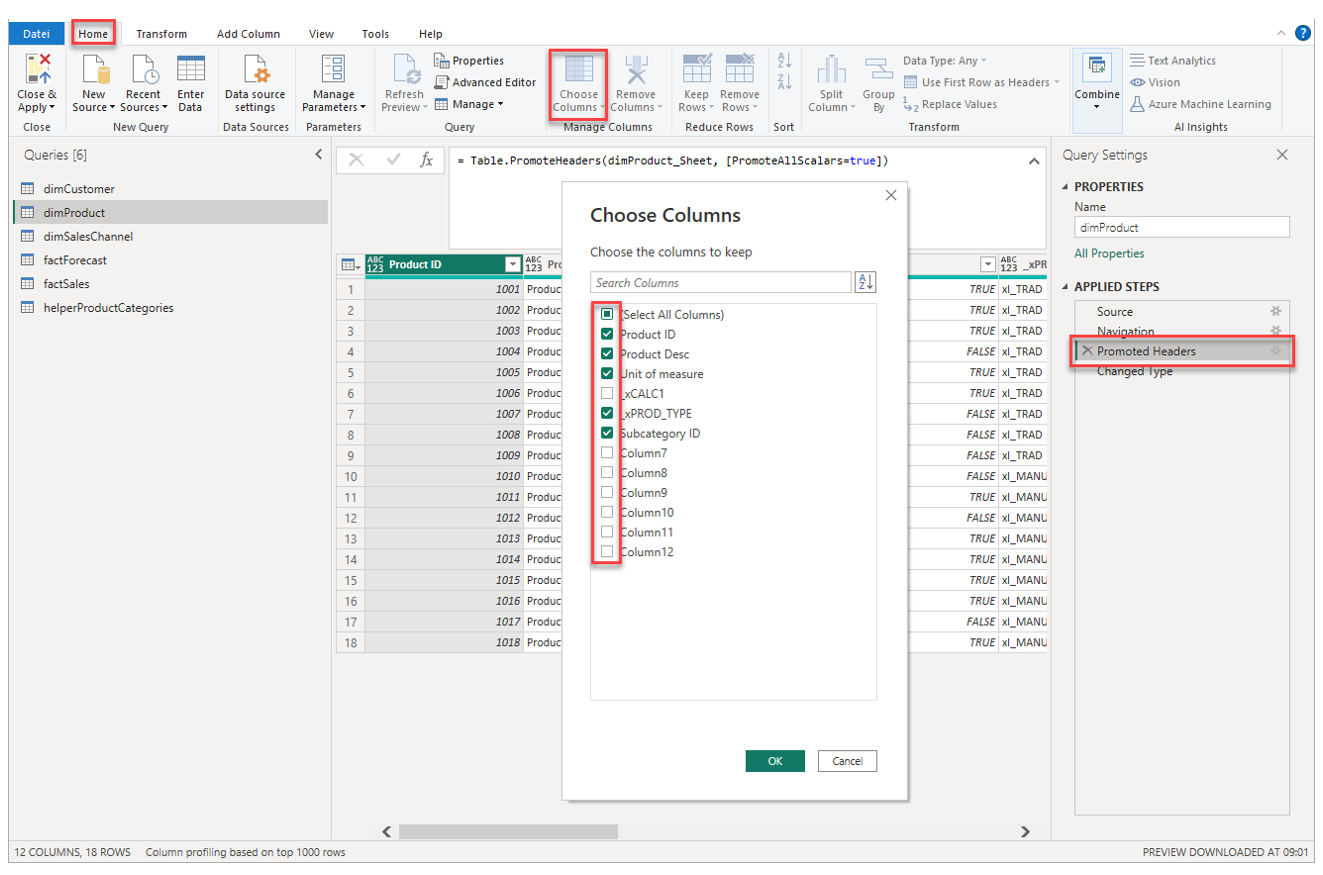
Select the transformation step Promoted Headers and follow Home → Choose Columns to select the columns needed.
When you do that, Power Query asks you to confirm inserting a transformation step between two existing ones. Confirm that with Insert:

For the upcoming transformation steps we only need the following columns:
3. Check and adjust the data types
Select the transformation step Changed Type in order to inspect the data types that Power Query has automatically set.
Immediately, we encounter an error:
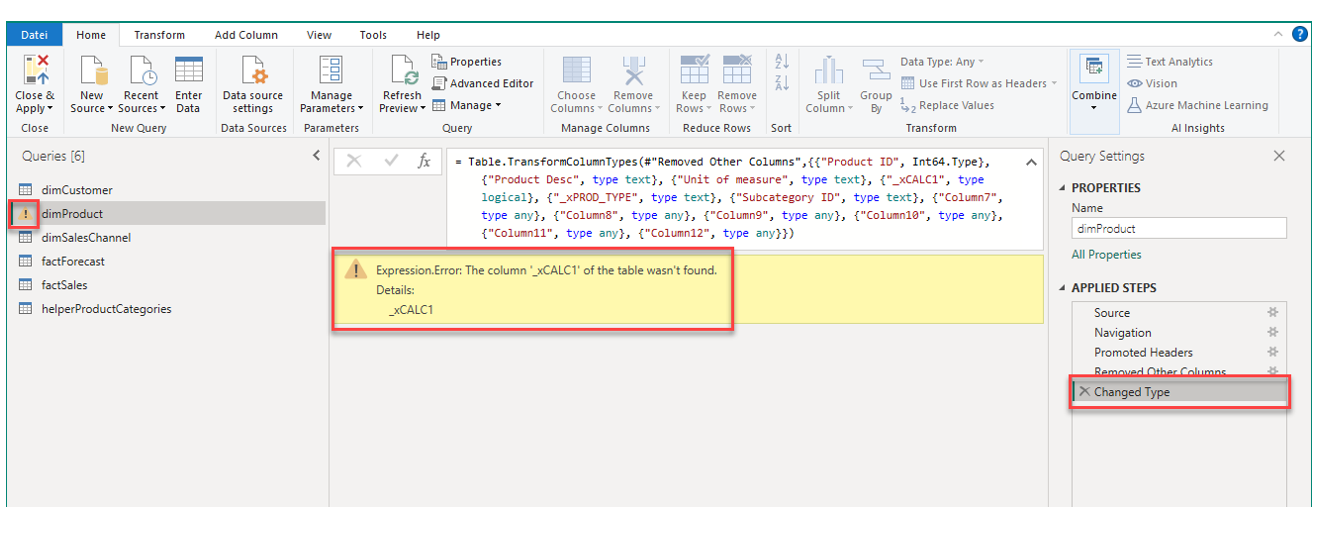
This error occurs because in the transformation step Changed Type, which Power Query automatically created when connecting the Excel, the code refers to columns which we actually removed in the precedent step Removed Other Columns. Because Power Query cannot find these removed columns anymore, e.g. the column _xCALC1, it gives us back an error.
The simplest way to remediate this error is to delete the step Changed Type and create a new one with simply setting the data type for the selected columns. As for dimCustomer, we neither have a date column nor columns holding numerical information with which we want to perform calculations. Therefore, define all columns to be the data type text.
The transformation steps Promoted Headers, Removed Other Columns and Changed Type are pretty much always used and applied to all queries in Power Query, usually as the first few transformation steps for a data table.
4. Combine Product ID and Product Desc in a new custom calculated column
As for dimCustomer, we want to create a new column which combines the ID and description of each product which is very useful later on when a user searches for a product by its description or ID.
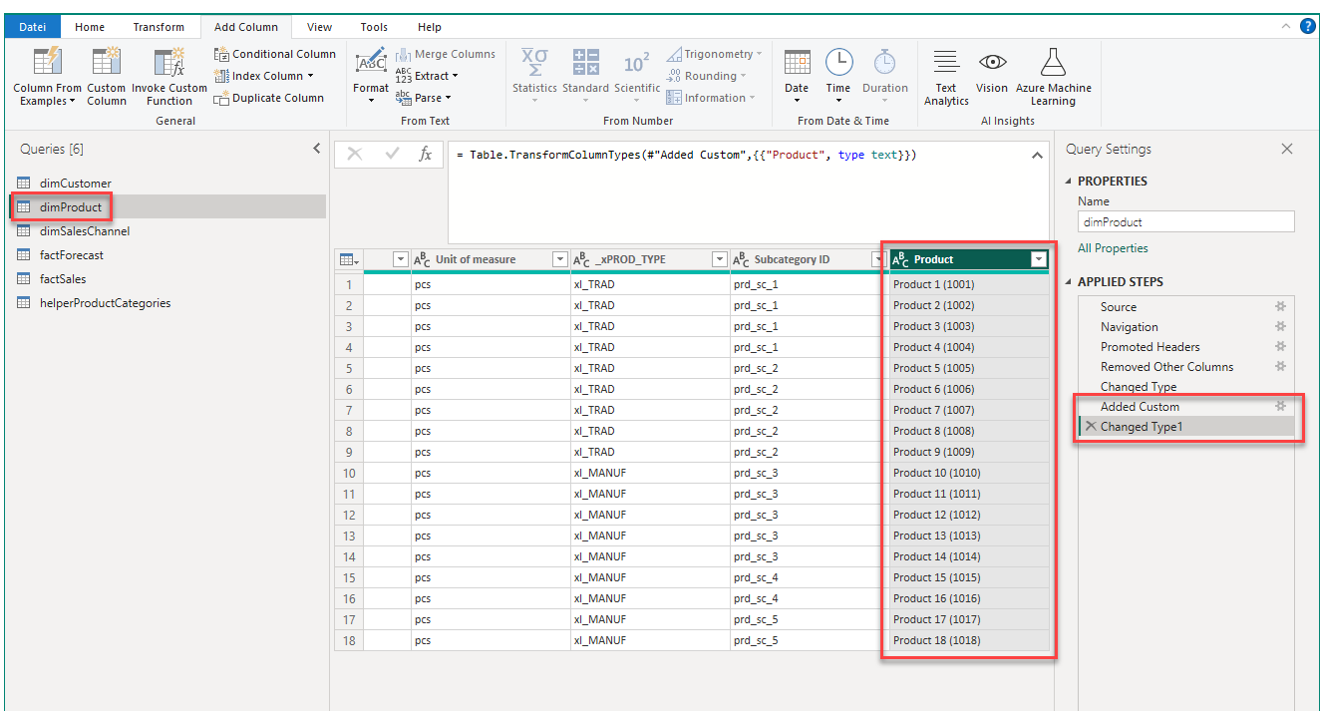
Add Column → Custom Column
In the appearing window, name the new column Product and enter the following code:
[Product Desc] & " (" & [Product ID] & ")"
And in a next step, change the data type of the newly added column to text.
After doing these steps, your Power Query should look like the following:
5. Join (merge) the table helperProductCategory
In the next step, we want to combine two tables with a table join. In Power Query, joins are called merges. One way to think about or understand a table join is to compare with a lookup in an Excel spreadsheet. Essentially, we are looking for matching members in the other (mapping) table and retrieve information from there based on a shared key (usually an ID).
In our dimProduct table we see there is a column Subcategory ID. Navigating to the table helperProductCategory, we can see there is also a column Subcategory ID and some additional namings for the product subcategories and categories. The goal is to map these subcategories and categories to our dimProduct table.
Before we combine the two tables, let's make sure the mapping table helperProductCategory is in a good shape. For that, navigate to helperProductCategory in the navigation on the left side of the Power Query interface.
Make sure the following steps are applied to the mapping table:
- Select only the columns Subcategory ID, Subcategory, Category
- Change the data type to text for all selected columns
- Remove duplicates from the column Subcategory ID (note, this is more for safety reasons as there are currently no duplicates, but maybe if the data source changes in the future we want to make sure there are never duplicates in this mapping table)
Power Query should look like this for helperProductCategory:

Now we can navigate back to dimProduct and perform the table join.
Home → Merge Queries
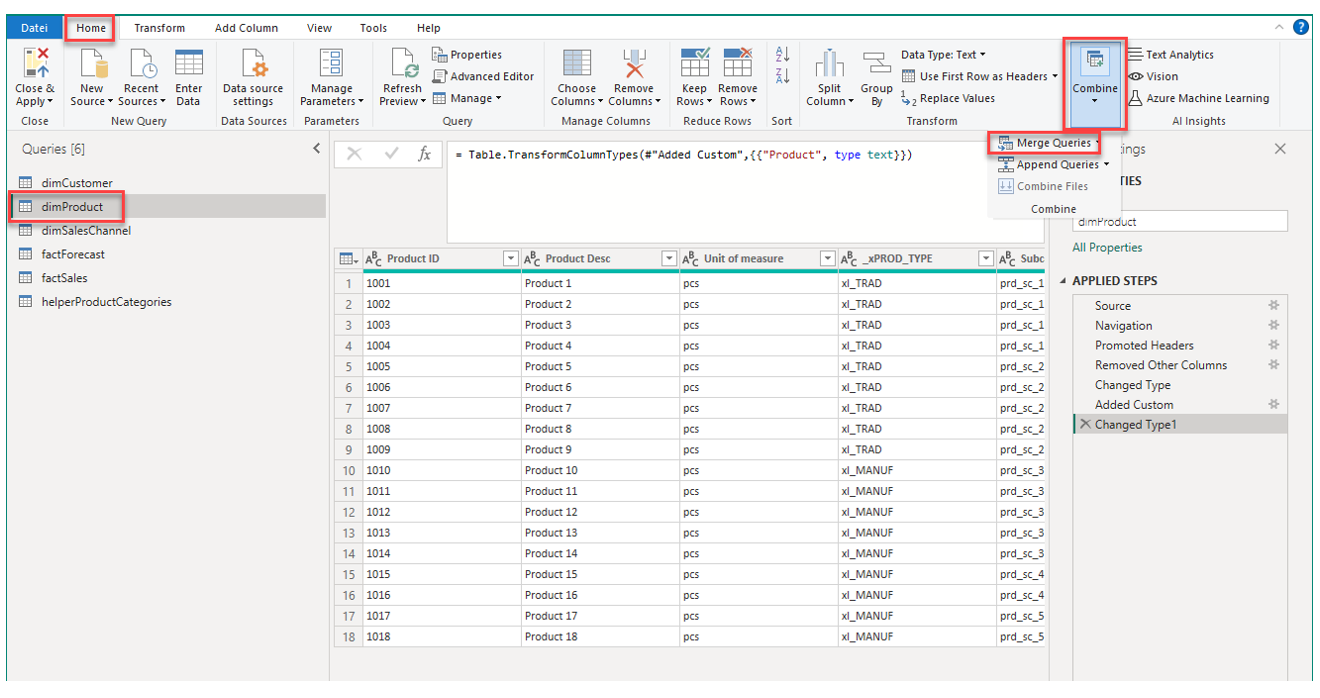
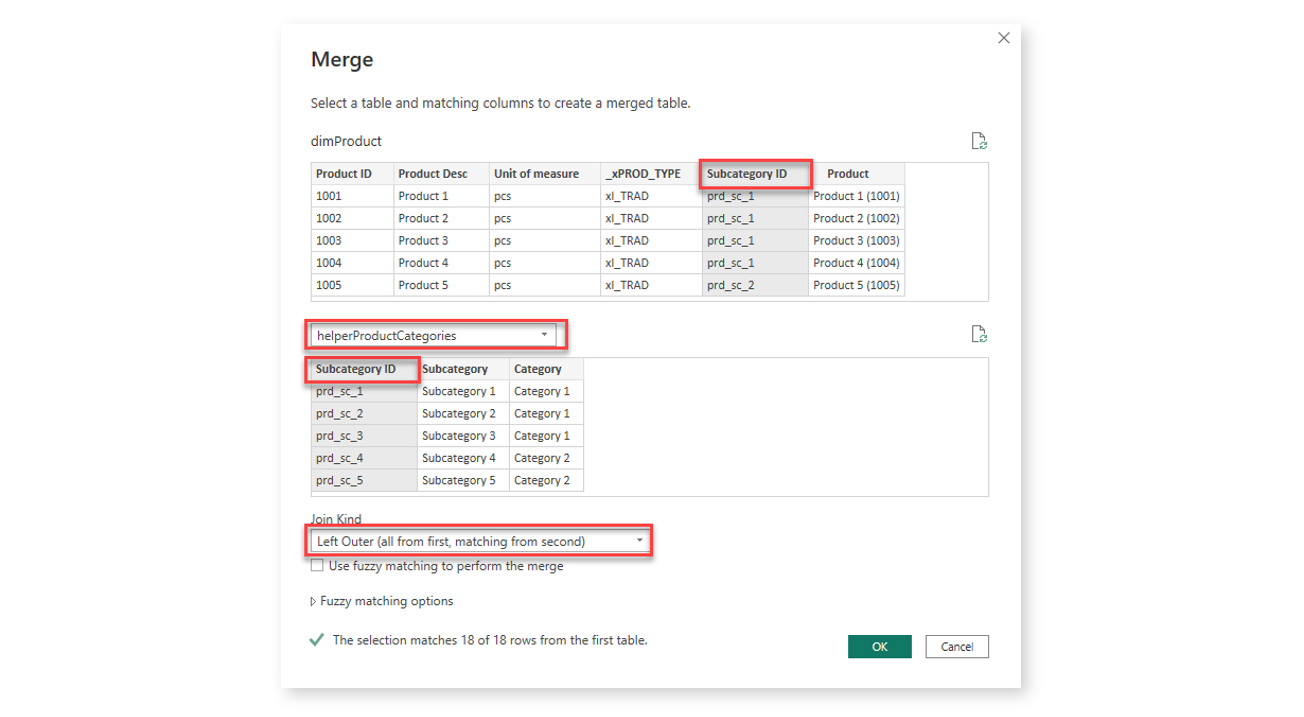
In the appearing window, select helperProductCategory as the second table (the table on the right of the join). Then, select in both tables the columns Subcategory ID (they should be grey as in the screenshot). Leave the join type on 'Left Outer (...)' and confirm with OK.
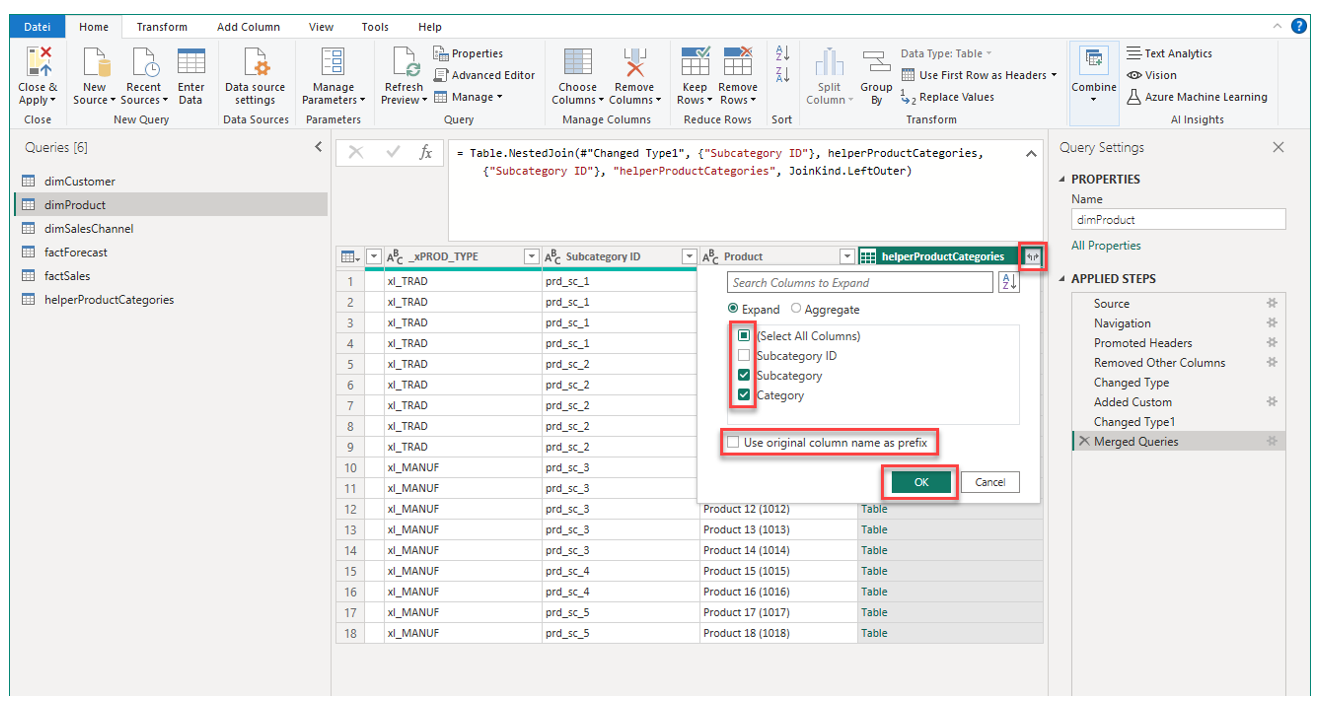
A new step Merged Queries should have appeard in APPLIED STEPS. From here, we have to select which columns of helperProductCategory we want to actually add to dimProduct.
In the newly added column, click on the symbol at the right end of the column header. Select the columns you want to add (plus, de-select the option about original column name prefixes) and confirm with OK.
Note, we de-selected Subcategory ID because this information already exists as a column in dimProduct.
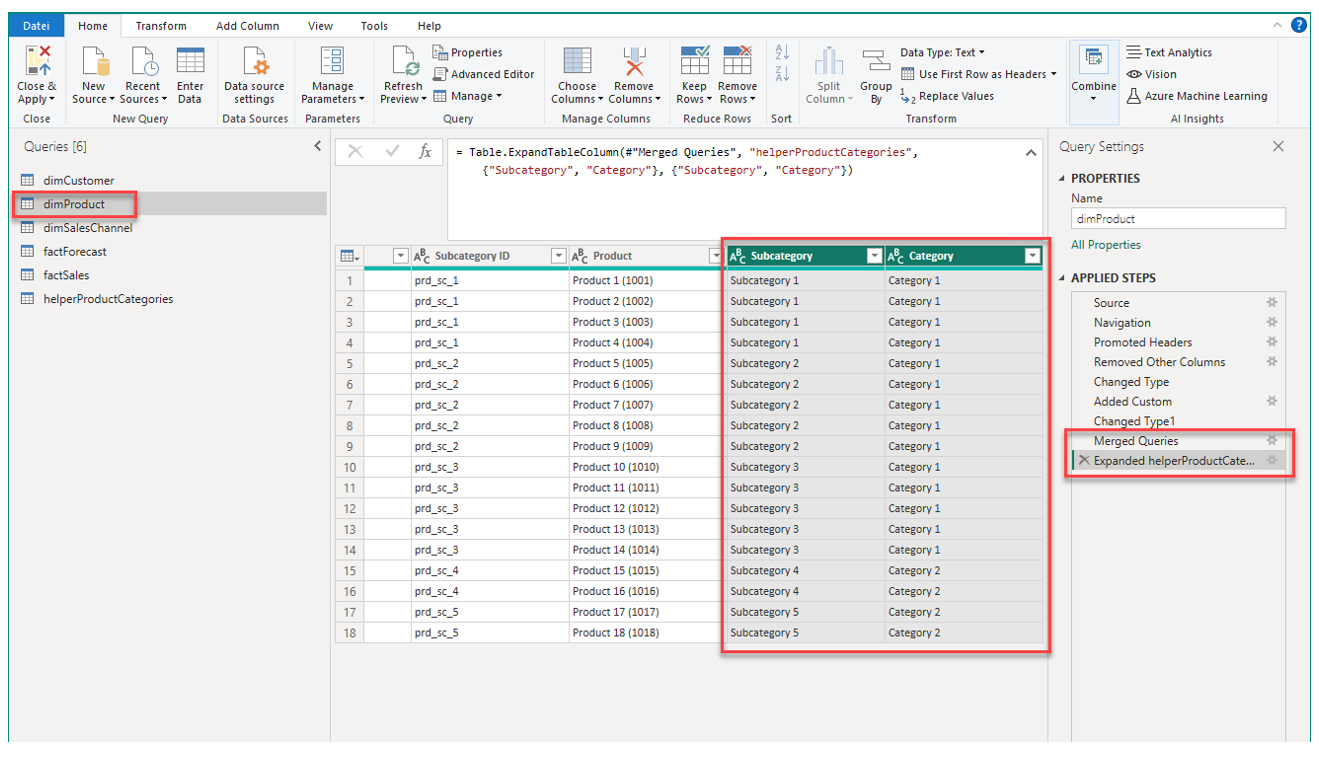
Your Power Query should like this now:
Before combining any two tables, make sure there are no duplicates in the column containing the mapping key in the mapping table. If there are duplicates, data is multiplied upon joining the two tables resulting in duplicated rows in the combined table.
6. Disable loading the mapping table helperProductCategory
In the previous step we used the table helperProductCategory to map product subcategory and category information to dimProduct. It functions as a supporting table and as such we do not need to load it to the final data model.
To disable loading this table, do a right-click on the table and click on Enable Load:
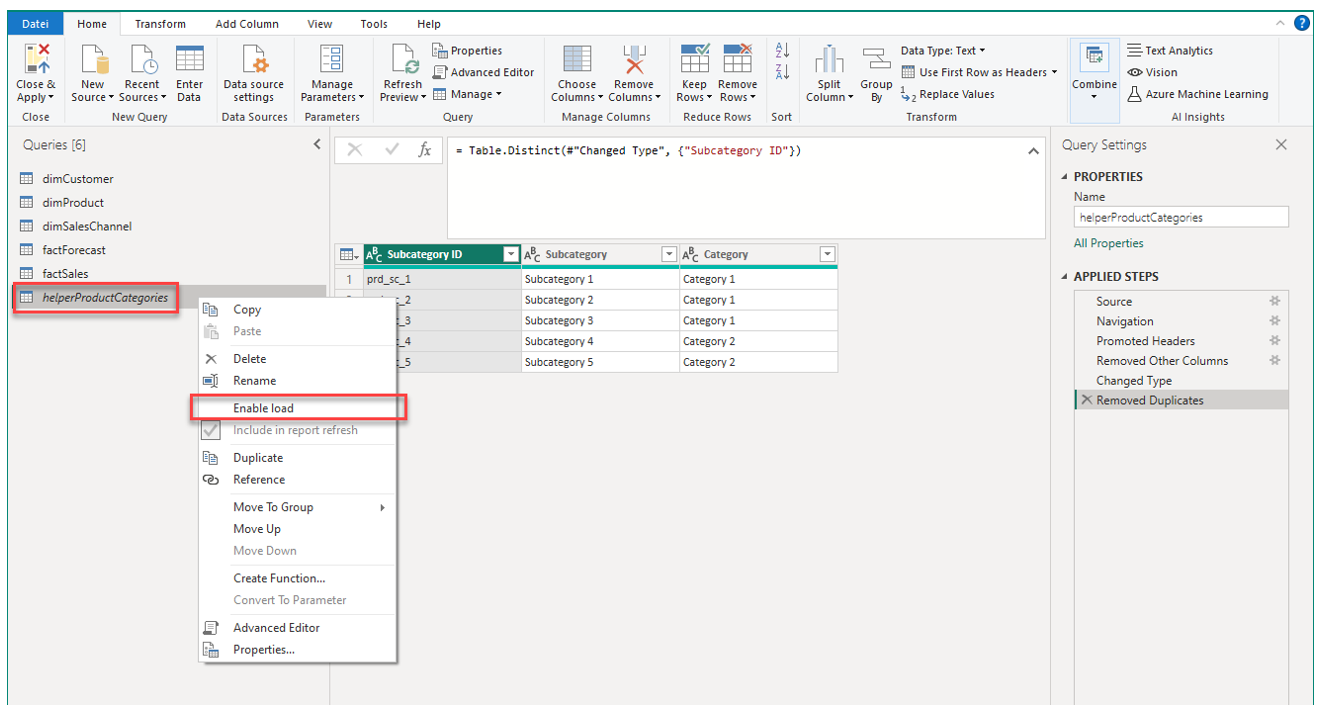
After disabling loading the table, its label should be appear in italic font.
7. Create a small mapping table helperProductType by manual input and join it with dimProduct
In our dimProduct table we can see there is a column with a rather technical label _xPROD_TYPE that contains some abbreviations. There are two distinct abbreviations, xl_TRAD and xl_MANUF. The provider of the data source tells us that the former stands for trade products and the latter for manufactured products. Because we do not want present such technical terms or abbreviations in any dashboard, let's replace these abbreviations with more speaking names.
One way to do this would be by replacing values, however this operation we already saw for dimCustomer and hence here I want to show another way: creating a small mapping table to be joined with dimProduct.
First, create the small table mapping the abbreviations to speaking names and call it helperProductType. For that, click on Enter Data under Home and a window appears that allows us to manually enter values into a table:
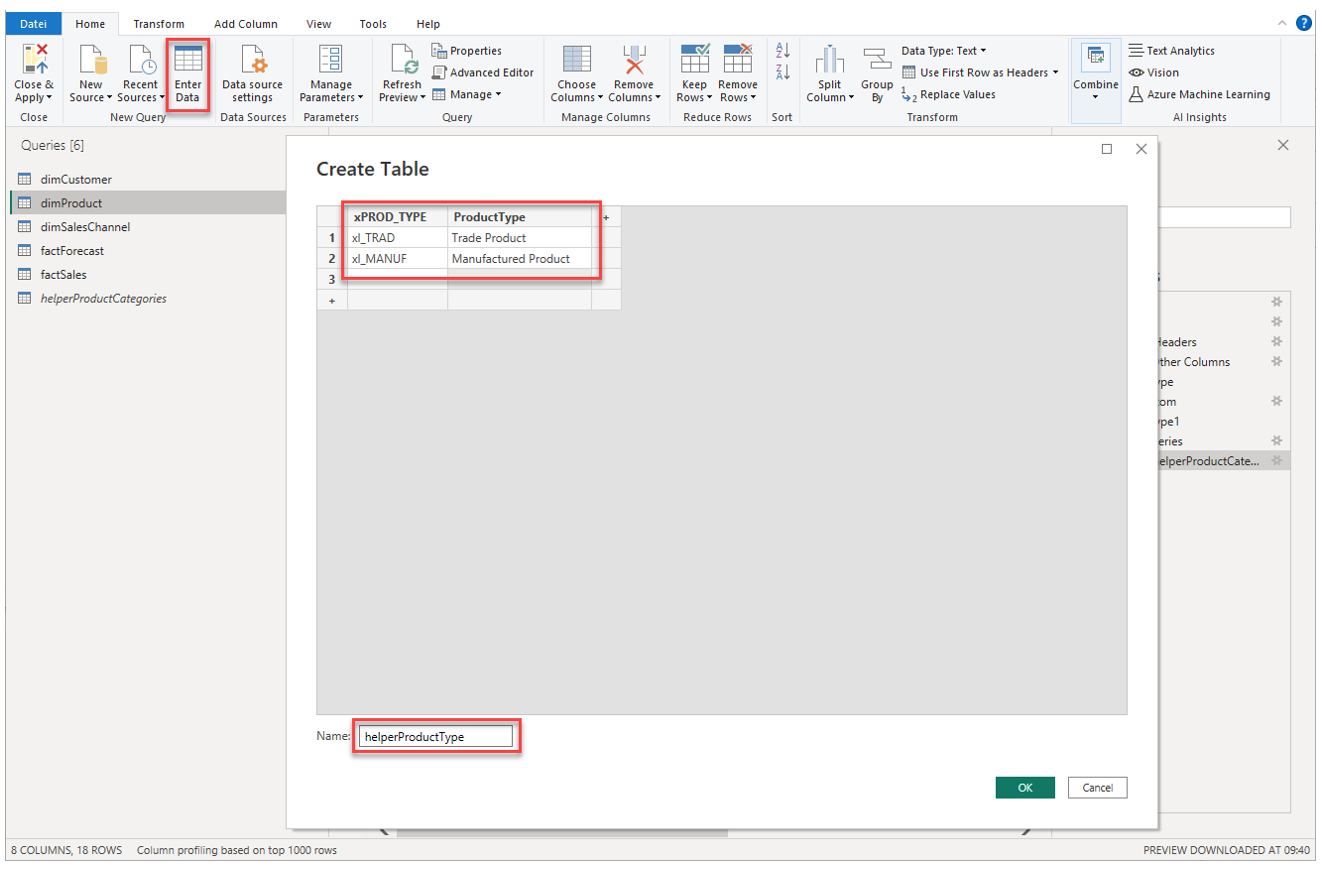
Confirm with OK and a new table shows up under Queries on the left. Navigate to the table and confirm it looks as intendend. Then, as in the previous step, disable loading the table.
Navigate back to dimProduct and perform the table join as follows:
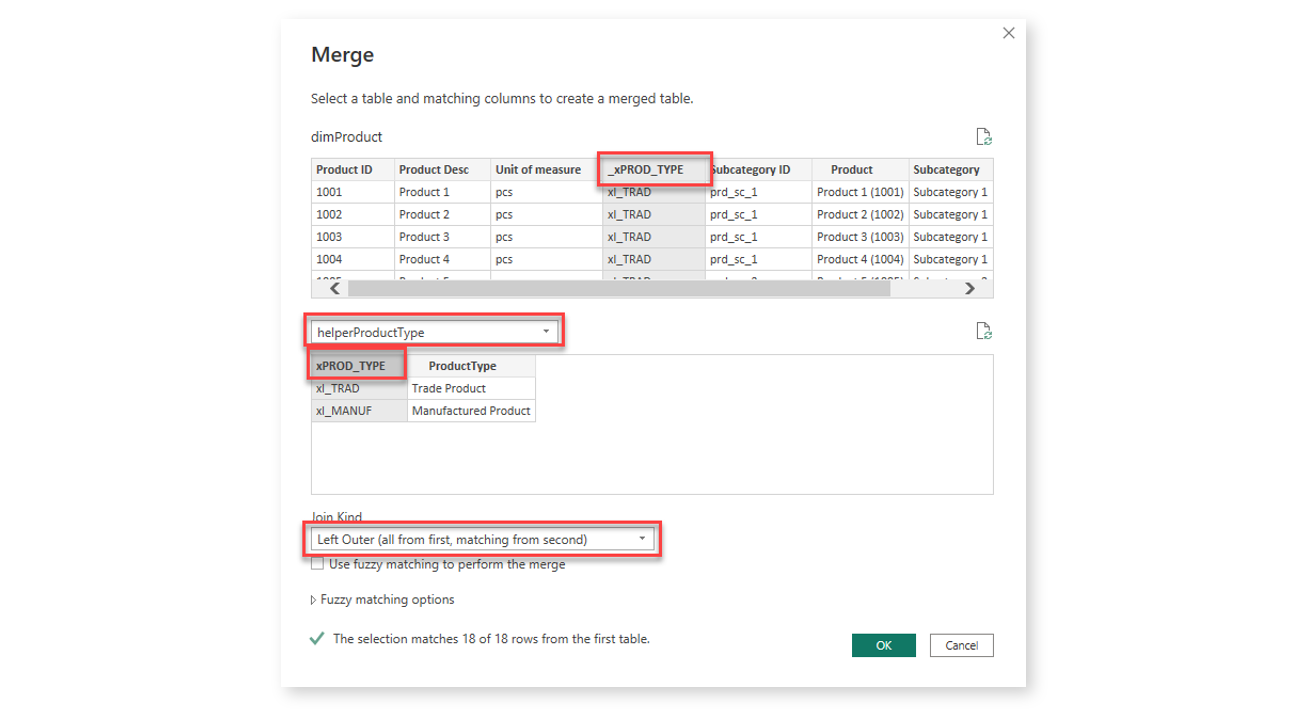
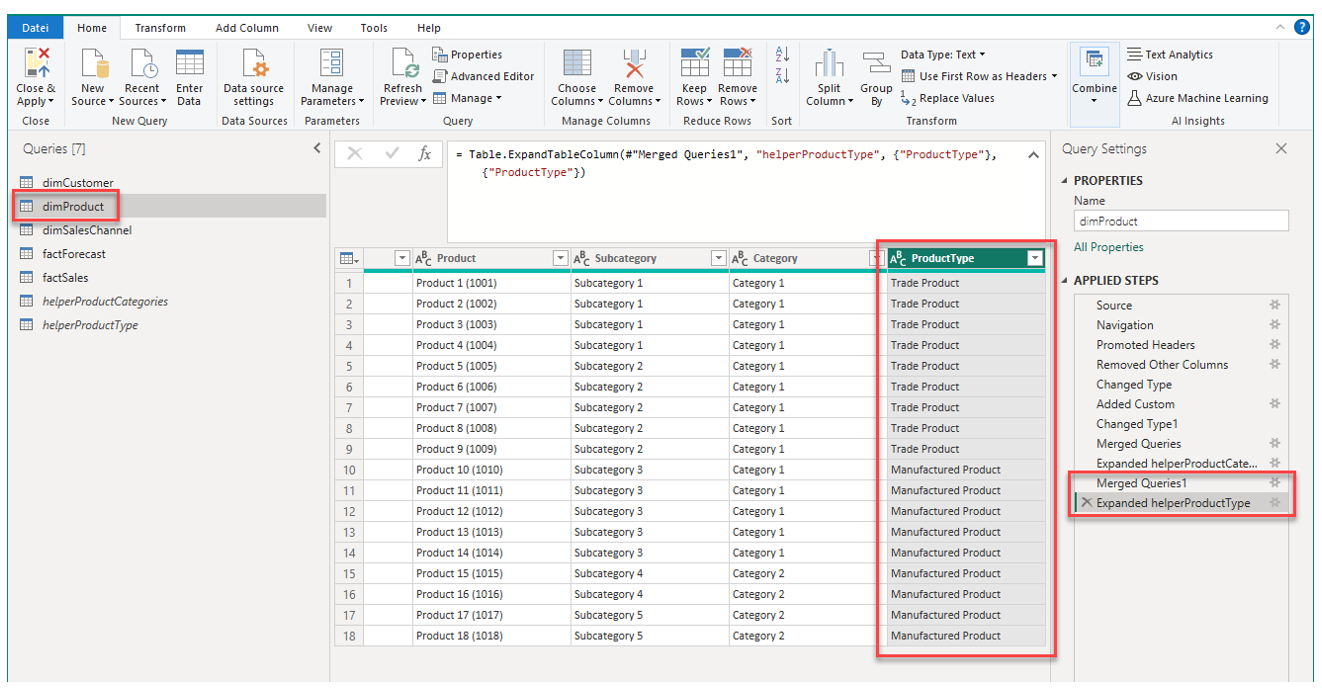
Then, expand the new column ProductType in dimProduct.
The table dimProduct should now like the following:
8. Remove the column _xlPROD_TYPE
We do not need the product type abbreviations anymore so let's remove the column:
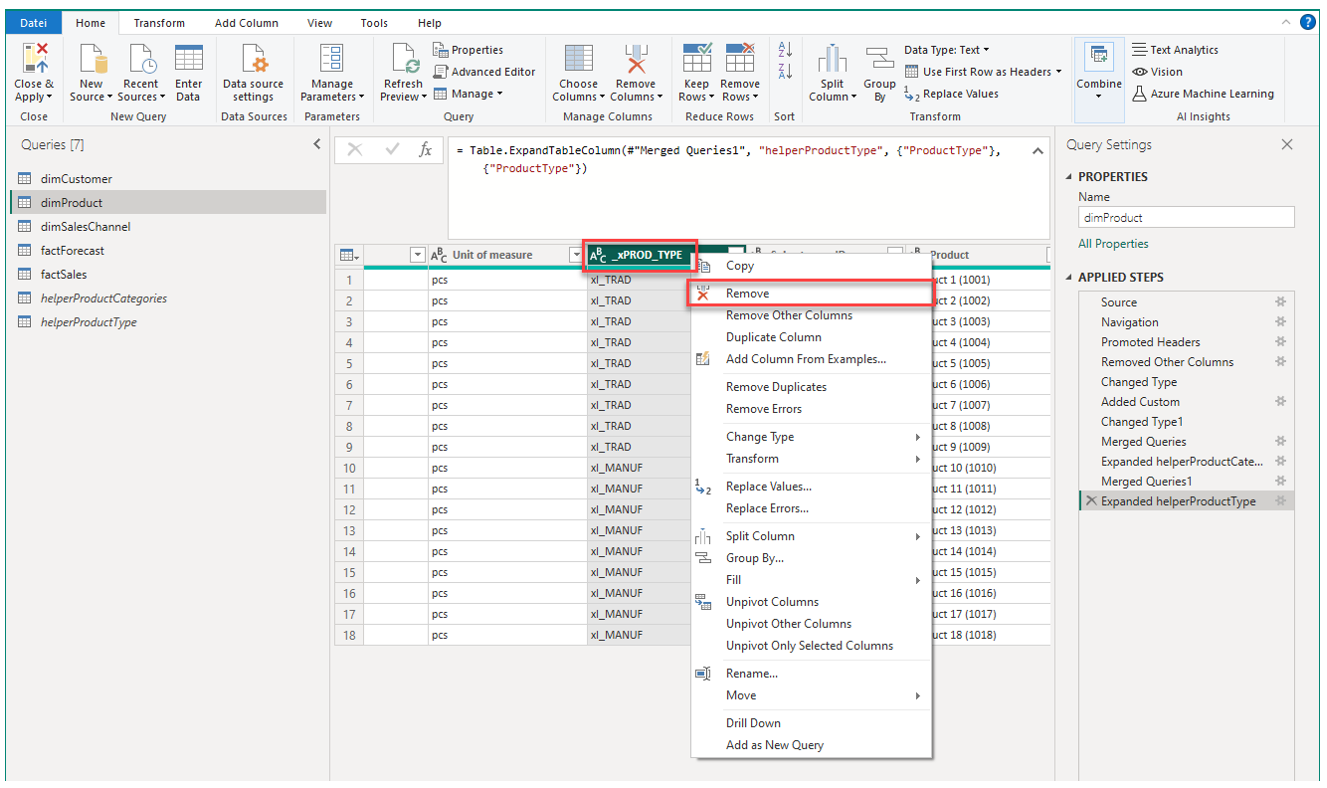
Alternatively, simply select the columns you want to remove and press the delete key on your keyboard.
9. Remove duplicates from column Product ID
Currently, there are no duplicates in Product ID. However, we want to avoid problems in the future in case duplicates suddenly show up in the source data. Because dimProduct is a dimension table and we will later use Product ID as the key to connect with the fact data, there would be an error on refreshing the dataset in case of duplicate entries in Product ID. So this last step is a safety measure to increase the robustness of the data model.